Showing posts with label Windows Tips. Show all posts

Creating a System Restore Point In Windows 7

Creating a System Restore Point In Windows 7
System Restore Point function to restore your computer to a state where you make the system restore. Restore is used when the computer is in trouble. For example, your computer can boot either, but can not get into windows / not display the desktop. Whereas before your computer is fine, but once you're fiddling with something on your computer, you get the problem. This is where the usefulness of making a system restore point, I think it's important to do.How to create a System Restore Point you are in a way like this. Follow the easy steps below (click image to enlarge):
  • Go to the Properties of My Computer, as shown below.
Masuk ke Properties dari My Computer
Go to Computer Properties
  • Go to the menu System Protection.
Masuk Menu System Protection
System protection entered
  • Select Local Disk (C :) (System), where your windows is installed. Then click the Create button.
Buat Restore Point
Create a Restore Point its
  • Give a description for the restore point that you created, such as there is in the picture. Click Create.
Berikan deskripsi untuk restore point anda
Give a description for the Restore Point
  • Windows will create a Restore Point you, wait until the loading is complete. When finished, click Close.
Loading Create System Restore Point
Create System Restore Point loading

Restore Point telah dibuat
Restore Point has been created
  • Completed
If you find a problem in the future and are desperate, examples of such problems that I have outlined above, using the restore point is to insert a CD / DVD / hard drive / flash your windows installation when booting and select System Restore. Choose a restore point.
Good luck and hopefully useful.

Submit Blog Sitemap to Bing (Yahoo)

Submit a sitemap is an activity that is so important, because it is accelerating how a URL in the index and how search engines recognize blogs that we manage. If the reader has to submit a sitemap to google , then it may submit a sitemap to Bing will also be more helpful articles indexed faster in the search engine Bing or Yahoo. Due to submit a sitemap to Bing, that is at once submit to Yahoo.

Submit Blog Sitemap to Bing (Yahoo)
To do that, the reader can follow these simple steps:
  1. Login to your account microsoft reader has (http://www.hotmail.com/)
  2. Sign in to Bing Webmaster Tools inhttp://www.bing.com/toolbox/webmaster
  3. Then fill in the URL of the blog readers in the box menu Add a site.
  4. Click the ADD. And fill in the forms as requested.
add a site
add site
Fill sitemap with the following URL:
http://www.komputerkamu.com / atom.xml? redirect = false & start-index = 1 & max-results = 500
or simply by
http://www.komputerkamu.com / atom.xml
For the domain blogspot blogger can also use the following URL: 
http:// .blogspot.com your blog / sitemap.xml? redirect = false & start-index = 1 & max-results = 500
or simply by
http:// .blogspot.com your blog / sitemap.xml
Replace the words with the red color to be on the blog URL submit sitemap.Furthermore the reader will be required to verify ownership of the blog in question. I usually choose the second option which is to include meta tags before <head> code in html code blog.

It's easy for users blogger.

  1. Sign in to blogger.com, and then select the blog in question.
  2. Go to the menu template. Then click the Edit HTML.
  3. Put meta tag after the code <head>
  4. Back to bing webmaster tools page, and then click VERIFY.
  5. Completed.
Edit HTML blog
Edit HTML
Typically pending status, will probably need a few days to be indexed. So the discussion of how to submit blog sitemap to Bing (Yahoo). Good luck and hopefully useful.

Stardock Decor8: Change Windows 8 Start Screen Background you with your choice Picture

Stardock Decor8: Change Windows 8 Start Screen Background you with your choice Picture
PC display can sometimes be a problem for some people. However, for me the PC display is not very important influence is performasi PC. For those of you who use Windows 8, you surely know that the bacground Start Screen in Windows 8 we can not change the will of our own. Windows already provides selected images to be background on the Windows 8 start screen.

For those of you who really want to replace it, you can use the help of Decor8 Stardock software. With this software notes paid, I was practicing in a state trial. By using this software you can change the backgroun start screen with the image of your choice on your computer. In order to do so, you can follow the steps as follows (click the image to enlarge):

  • Download Stardock Decor8 advance, you can download it here(http://www.techspot.com/downloads/5590-decor8.html).
  • Then you will get the installation file. Install as usual on your computer.You will find it running automatically when the installation is complete.This software is installed on a computer with the name Decor8.
  • After apilkasi running, you will be given the option to use the application for trial or to buy the application. As of this writing the price is $ 4.99, approximately less than Rp 50,000, -
Trial
Trial
  • I chose trial. When an application is open, on the Background tab, clickSelect Folder ..., in the window that appears click Add ..., then select the folder where you put the image you want as a background on your Start Screen. Then click OK.
Pilih Folder Anda
Select your Folder
  • You will find a warning from Windows. Due to the Windows setting is in this case no. Click Yes.
    Note: The author is not responsible for things that could occur due to this Decor8 software.
Klik Yes untuk melanjutkan
Click Yes to continue
  • You will be returned to the Select Folder window. Uncheck the default directory above three folders that you selected earlier, so that only the image that is in your folder that appears in the picture choice. Then, clickClose.
Klik Close
Click the Close
  • Choose an image of your choice. If you select more than one click image while pressing the Ctrl (Control). You can set your image, click next to the Tick Enable to edit display your image. And click Check next to theShuffle to activate the shuffle mode image transition (if more than one).You can also set the time change images. Click the sign of the cross in the upper-right corner when you are finished.
Tambahkan gambar-gambar pilihan anda
Add pictures of your choice
Hasil Software Decor8 di PC Penulis
Decor8 results on PC Software Authors
The final decision is on you. Please you try it if you want. Amazing is notDecor8 this software? Good luck and good luck.

Rows And Columns Semat way in Microsoft Excel 2007

Rows And Columns Semat way in Microsoft Excel 2007
Some time ago I was baffled by the features of Microsoft Excel 2007 on peg rows and columns. Getting an excel file but when discroll down some lines that do not move when discroll. Similarly, when scrolling to the side, there are some fields that are not part moves.

Looking for how to with some key words in google, still could not find how to do that. And after all this time I accidentally found its name, which is called Freeze Panes. The feature is located in the View menu in excel.

How it Works Freeze Panes

By using the freeze panes feature, we can embed the column, row, or column and row. Usually this is done for a table, for example, the table value.
Because so length down or to the side, when we look at the contents of the table at the bottom or side and is far from the name of the column or row, we forget the actual value is the value of what we read. So we need more pages to scroll up or to the side.

With the freeze panes, we can embed the value of the name for example row, or column name of students. So we do not need to scroll back to the top or to the side early. From what I said above that the freeze panes can be sewed only columns, only rows, or rows and columns.

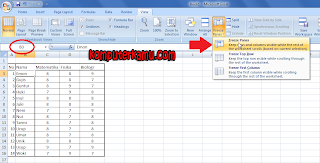
Freeze Panes menu

Freeze panes has three menus,
  1. Freeze Panes
  2. Freeze Top Row
  3. Freeze First Column
Menu Freeze Panes
Freeze Panes
Hasil Menu Freeze Panes
Freeze Panes results
The second picture is the view when discroll sideways and down, then there are two lines that do not participate discroll and one column that does not come discroll.
The first menu is the menu freeze panes. The menu is very concerned at all with the current cell. In the picture above the active cell is cell B3. If we clickFreeze Panes menu that will be embeddable is the previous column (Cell A1-A2, B1-B2, C1-C2,   and so on) and the previous row (Cell A1, A2, A3,   and so on) as indicated by the second picture.

The second menu is Freeze Top Row. From his words we can know that the menu sewed the first row in excel (Cell A1, B1, C1, and so on).
The third menu is Freeze First Column. This menu sewed the first column of the excel worksheet (Cell A1, A2, A3, ... and so on).

Transfer, Sharing / Sharing Files Via Wifi / Hotspot

Transfer, Sharing / Sharing Files Via Wifi / Hotspot
When you need to share files with friends, relatives, or anyone else, while you do not bring a USB flash or an external hard drive, and is also not possible to send the file via email because the file size is too big for example, the following solutions may be useful. 

If you are in the area where there is a hotspot / wifi and each computer / laptop and your friend's laptop can connect to the hotspot then the exchange of files can be done through the hotspot. 


Actually a lot of ways to be able to share files between computers / laptops when flash / external disk is not available.Can via Bluetooth, ad hoc wireless connection , immediately wired LAN, etc.. 


Advantages of connection and file sharing via wifi is we do not have the settings for the connection such as IP settings, etc. pairing. Has to do is setting for his sharing folder only. 

We assume both the laptop (with Windows 7) is connected to the hotspot (hotspot the same course) 
Eg A laptop and Laptop B. A laptop that will share files, laptop B which will take the file 


 The first step, specify the folder that will be shared / divided (Laptop A) 
For example, here I will menshare folder with the name of the folder "doc" 
Right click on the folder that will be shared (Doc folder), and then select Properties 


On the Sharing tab, click Advanced Sharing


Tick ​​Rate (checklist) on Share this folder, and then click Apply / click OK


 The next step, disable / turn off the Windows Firewall, (go to Control Panel, select Windows firewall, right off the Windows firewall)


 Then, in order of laptop B can retrieve files from a laptop then must know the IP address A Laptop.
Open Command Prompt, from the Run menu (Windows Logo + R) type cmd, and click OK


Once the Command Prompt window appears, type ipconfig and press Enter


In the example I get the Ip addresses 192.168.1.100 


 The last step, ie accessing files / folders from laptop B 

Of B laptop into the RUN menu (press the Windows Logo + R)
Then type the backslash sign 2x (\ \) spliced ​​with IP Laptop A was 
\ \ 192.168.1.100 
click OK 


The folder will then appear on Laptop A last disharing 


Open the folder and we've been able to copy and paste from the folder to be shared on a Laptop A laptop drive in B. 

Opens Protection Web Page / Blog Which can not be copied

Opens Protection Web Page / Blog Which can not be copied
When you find the article you are looking for in a blog or website, and you need to copy it but could not because his home is protected, for example, his article could not dihighlight (selected), or can not be right-clicked, so you can not copy it. 

The protection generally uses javascript, so to open the protection that we do is to disable / turn off javascript in the browser. 

Here's how to disable / turn off / turn off javascript for browser Google Chrome, Mozilla Firefox 
(After Javacript turned off, refresh the web page or blog is protected earlier). 


Disable JavaScript in Google Chrome 


 Click on the menu settings (logo tool on the right page) 
 Then click the Options 


 Select the Under the Hood
 Click on the Content settings


 In javasript, select Do not allow any site to run JavaScript


Disable Javascript on Mozilla Firefox

 Go to Menu Options


 Select the Content Tab 
 Remove the Tick mark in Enable JavaScript 


 Click on OK

Computer Remote / Remote Desktop Through Internet

Computer Remote / Remote Desktop Through Internet
When you're out of town or even abroad, and you have access to your computer at home, in the office or anywhere else. to copy files or other purposes, or for troubleshooting problems in the client program or your customers a short distance, or for the purposes of setting the configuration tool / machine etc, the solution is to use a remote computer via Internet applications. 

With the application of remote computer / remote desktop, as if we were right in front of the original computer (which diremote) because it will look exactly the same. 

One of the applications that are reliable for this purpose is TeamVewer, a free app (free for personal, paid for commercial use), size of the installer is only about 3MB, to download just go to their site at www.teamviewer.com or to download the zip file (for Windows) click here 

TeamViewer is to install and use is easy, to be installed on two computers will diremote and that would remotely. Installnya lived next next till the finish, no need to change the settings, let it default. 

When the application is run it will display the ID number and password 


We will remotely should know TeamViewer ID number and password of the computer that will diremote, this could diinfokan by phone, SMS or email.
ID number that we can from the computer that will diremote then we enter the Partner ID column, click on Connect to partner to launch remotely.
(On the computer that will diremote does is run the TeamViewer application and menginfokan ID number and password to us / people who will remotely).

After click on Connect to partner it will display the password request, just enter the password only. then click Logon, then the computer will perform diremote.


May be useful.
 
 
Design By Luhur Fatah - Powered By Blogger