Before you install windows first set the BIOS (Basic Input Output System) BIOS settings as for the way I have made in such a way below with pictures so that you can understand it, and for all its faults I apologize in advance if it does not fit as you expected. Please follow the steps below BIOS settings:
")
STEP 1
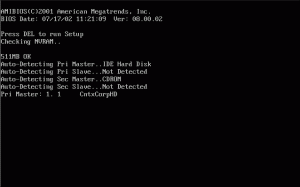
Press the power button on the PC and the monitor to turn on your computer. PC will soon be booting
STEP 2
Immediately press the [Delete] on the keyboard to enter the BIOS / CMOS Setup
STEP 3
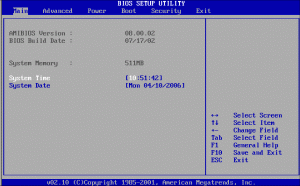
You will enter the BIOS. The first thing you should do is setting the time that will be used by the computer system. Arrange by menu [Main], [System Time]. To change it, use the [+], [-] and the [Tab] on your keyboard
STEP 4
Furthermore , in the same way , change the date on your computer system through the [ System Date ] .
STEP 5
After setting the time and date of the system , if you like , you can also install
BIOS password so that other people can not change the BIOS settings that you made . The trick , select the [ Supervisor Password ] , and then press the [ + ] on the keyboard . Next, enter your password in the Enter Password box , and then click [ Enter] . Enter your password again in the Confirm Password box , and then re- click [ Enter] . Current status word SupervisorPass option has become Enabled .
STEP 6
If your PC will be used rollicking , you also can set the user password for each user . Take advantage of all the [ User Password ] . Way of setting it up is the same as setting the supervisor password .
STEP 7
Now open the [ Advanced ] menu by pressing the [ â € ¡ ] ( direction of the arrow to the right ) on your keyboard , and select [ I / O Device Configuration ] and then [ Enter]
STEP 8
Here you can set the use of onboard features on your motherboard . For example , when you use a sound card and modem are not on- board , change the option [ On -board AC97 Audio Controller ] and [ On -board AC97 Modem Controller ] to [ Disabled] by pressing the [ + ] key on your keyboard . Then click the [ Esc ] to return to the [ Advanced ]
STEP 9
Now select the [ PCI Configuration ] and press [ Enter] . Then order your USB slot function set option [ USB Function ] to [ Enabled ] . If not , you can change it by pressing the [ + ] . If so, go back to the [ Advanced ] menu by pressing the [ Esc ]
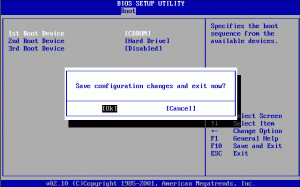
STEP 10
Then open the [ Boot ] .
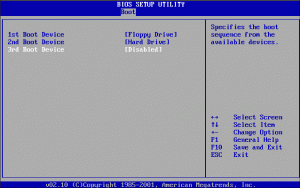
to facilitate the installation of the operating system that will be done after this, change the boot settings of the PC. Then set the CDROM as the first boot device, or if you want to perform the installation of the Flash Disk CDROM replace the flash disk with the name.
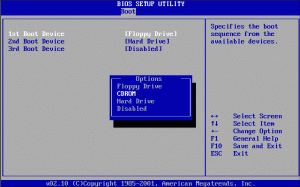
Then the Hard Disk as the Boot Device Floppy 2nd and 3rd Boot Device (Disable if you do not select it), by using the [+] or [-]. Point, so that every time booting, look for a computer operating system on CD-ROM first and then the hard disk, and floppy.
STEP 11
Insert the Windows XP installation CD into the CD-ROM drive. After that, select the [Exit], [Exit Saving Changes] to exit the BIOS and save the settings that you created earlier. Computer will restart. And if you had to enable the user password, the password box will appear. Fill the password so that the computer can continue the boot process. completed
You have just read an article that categorized Component of Computer /
Definitions /
Solve Computer /
Windows 7 /
Windows Tips /
Windows Vista Tips /
Windows XP
by title "11 Steps to Setting System Configuration BIOS (Full Figure)". You can bookmark this page with a URL http://de-computer-tips.blogspot.com/2013/10/11-steps-to-setting-system.html.


